During a recent upgrade of VCF 4.1 to 4.1.0.1 and then on to 4.2, I found myself in a bit of an unsupported situation due to the use of a build that was not part of the VCF 4.2 Bill Of Materials (BOM).
Symptom: SDDC Manager 4.2.0 will not apply the 4.2 update to the ESXi hosts even though the Update 4.2.0.0 bundle for VMware ESXi 7.0 Update 1d has already been downloaded.
History
I am new to VCF and using SDDC Manager. My team uses a lab environment that will started up by deploying VCF 4.0 a while back. When it came time to upgrade to 4.1, the upgrade of the ESXi hosts kept failing. It took a bit to realize that we needed the Custom ISO image for our DellEMC hosts (R640). Once we realized this, we went to the VMware Downloads site and located the 7.0 U1 custom image since that is what VCF 4.1 was targeting.
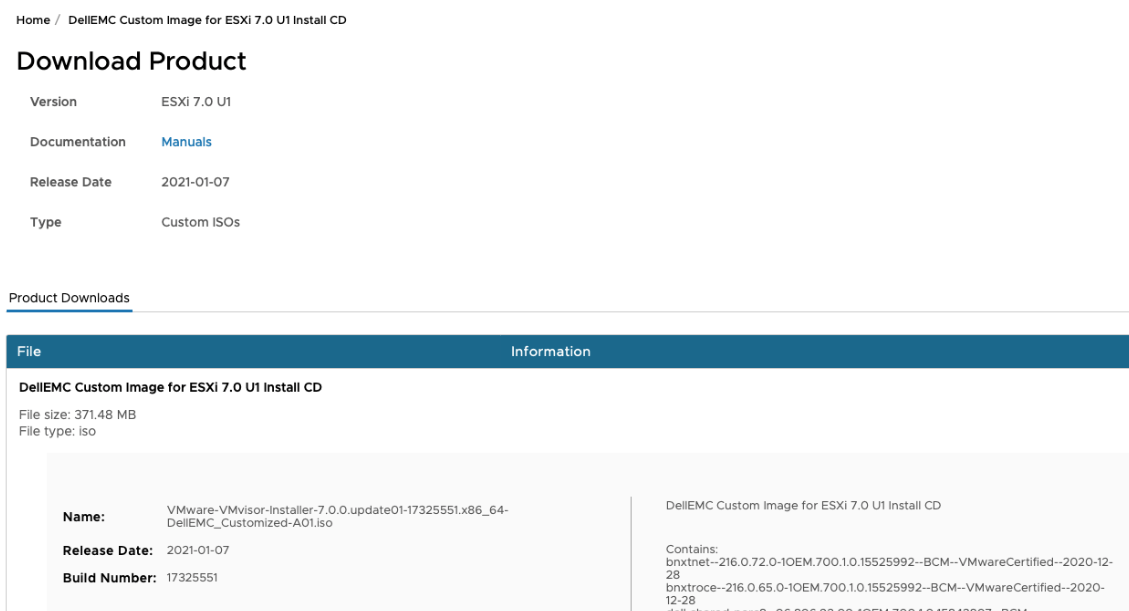
As per the documentation, I connected to the SDDC Manager via SSH and created the appropriate configuration json file (/nfs/vmware/vcf/nfs-mount/esx-custom-image-upgrade-spec.json), put in the build numbers, and uploaded the custom ISO image to the server. I went back to the SDDC Manager and the upgrade of the ESXi hosts went along very nicely. All is good now, right? …. Wrong!
At the time of my work, and all of the experience leading up to this blog post, there was no clear statement that you MUST use the exact build number for a product as what is shown in the BOM. Like many others, I wrongly assumed that ESXi 7.0 U1 custom image from the official download page must be correct… I actually needed build 16850804!
Another reason that people may apply an updated ISO that does not match the BOM: Vendor instructions. During my troubleshooting and documenting of this issue, I ran across a colleague who was experiencing the same issue - but in his case, it was not the DellEMC Custom image, but another hardware vendor’s image that had been recommended to upgrade due to some other important patches that were in the build that was applied.
Incorrect Build effects
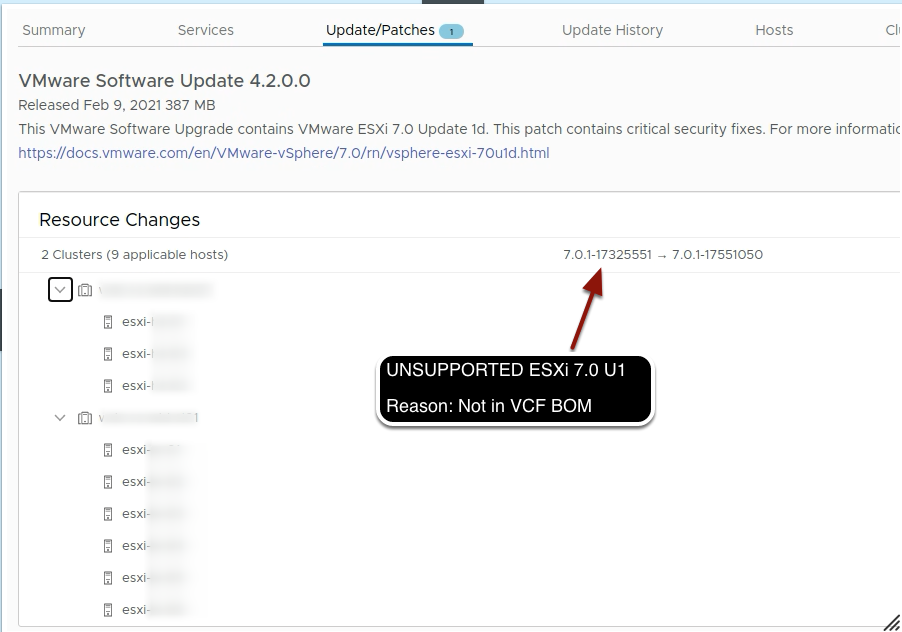
If the SDDC Manager bundle shows a specific version, but the host is running a newer build than what is specified in the bundle, SDDC Manager will not show the upgrade as applicable. Instead, the upgrade bundle (if manually downloaded) will immediately move to the “Download History” tab of Bundle Management in the SDDC Manager. This can happen when you apply an incorrect build number to your ESXi hosts (IE: Download a vendor specific build from VMware or other site that does not exactly match the build number in the VCF BOM). In my case, when I upgraded from VCF 4.1 to 4.1.0.1, I found the ESXi 7.0 Update 1 Custom DellEMC ISO that I needed from the official VMware downloads site and used it for the upgrade.
Trouble upgrading to VCF 4.2
My upgrade from VCF 4.1 to 4.1.0.1 went fine because there was not an updated ESXi build as part of that update… However, when it came time to upgrade to ESXi 7.0 Update 1d, I ran into a bit of an issue. Even though the bundle had been downloaded for the newer version of ESXi, the clusters continued to show as Up-to-date and the updated Bundle I had downloaded went to the Download History tab!?

What now?
Ok, so now I have an environment that is stuck between VCF 4.1.0.1 and VCF 4.2, with the ESXi hosts being the remaining upgrade needed - but the SDDC Manager is not cooperating.
I reached out for assistance and recommendations internally. The first responses were essentially:
I was not too thrilled about the idea of rolling back all the servers across multiple clusters in order to get SDDC Manager to work. There must be a better way! Something less obstructive. So I continued to reach out to contacts. While discussing the possibility of modifying config files with a colleague, I began exploring the filesystem on the SDDC Manager and came up with a solution that did NOT require rolling back all my servers or doing any reinstalls!
Workaround
To work-around this, the manifest bundle definition file for the ESXi host can be modified to change the “bundleElementPreviousVersion” to the version that the hosts are actually running.
Step 1: Identify Bundle ID
Identify the Bundle ID. Open SDDC Manager and view the details of the Bundle, locate the Bundle ID.
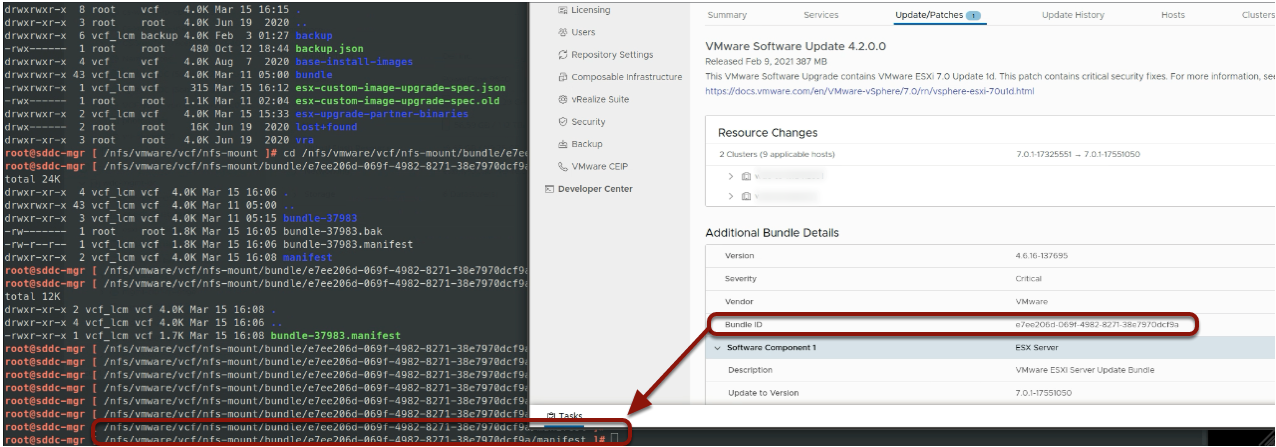
Step 2: Locate Manifest file
Locate the relevant bundle folder on the SDDC Manager file system and change into the manifest subdirectory:
1cd /nfs/vmware/vcf/nfs-mount/bundle/e7ee206d-069f-4982-8271-38e7970dcf9a/manifest
Step 3: Edit the Manifest
Open the file and locate the line with “bundleElementPreviosVersion”. The file will initially show the correct supported previous version of “7.0.1-16850804”. In the snippet shown below, I have already modified line number 21 to reflect the “VCF Unsupported” build of ESXi 7.0 U1 that my hosts are running.
 1{
 2  "bundleId" : "e7ee206d-069f-4982-8271-38e7970dcf9a",
 3  "bundleType" : "VMWARE_SOFTWARE",
 4  "description" : "This VMware Software Upgrade contains VMware ESXi 7.0 Update 1d. This patch contains critical security fixes. For more information, see https://docs.vmware.com/en/VMware-vSphere/7.0/rn/vsphere-esxi-70u1d.html",
 5  "productVersion" : "4.2.0.0",
 6  "bundleVersion" : {
 7    "major" : 4,
 8    "minor" : 6,
 9    "patch" : 16,
10    "build" : 137695
11  },
12  "manifestVersion" : 10,
13  "bundleVendor" : "VMware",
14  "bundleSize" : 386877440,
15  "bundleElements" : [ {
16    "id" : "8309fa21-0968-432c-8bd6-243e760e1504",
17    "bundleSoftwareType" : "ESX_HOST",
18    "component" : "ESX Server",
19    "bundleElementVendor" : "VMware",
20    "bundleElementVersion" : "7.0.1-17551050",
21    "bundleElementPreviousVersion" : "7.0.1-17325551",
22    "checksum" : "7686c9923250b948654451ae554897fa8affb5a9cd7cbcb46e3cc8d5378c4725",
23    "file" : "VMware-VMvisor-Installer-7.0U1d-17551050.x86_64.iso",
24    "releaseDate" : 1612900800000,
25    "description" : "VMware ESXi Server Update Bundle",
26    "imageType" : "PATCH"
27  } ],
28  "installationMetaData" : {
29    "bundleId" : "e7ee206d-069f-4982-8271-38e7970dcf9a",
30    "installationMetaDataInfos" : [ "" ]
31  },
32  "bundleDowntimeRequired" : false,
33  "bundleChecksum" : "a54f0538e8f27f8429548343a55fabb51dbb820b2314745c67449de1e0e71cc9",
34  "source" : "VMware",
35  "releaseDate" : 1612900800000,
36  "tarFile" : "bundle-37983.tar",
37  "severity" : "Critical",
38  "applicableToOlderVersion" : false,
39  "complianceCheckRequired" : false,
40  "minComplianceLevel" : [ ],
41  "isCumulative" : false,
42  "isUserInputRequired" : false
43}
Step 4: Restart LCM Service
After modifying the manifest file, you must restart lcm service in order for your modified manifest definition to take effect.
1systemctl restart lcm
Step 5: Proceed with Upgrade
Now, revisit your clusters in SDDC Manager and hopefully you’ll see the Update/Patches showing the Bundle ready!
This allowed me to proceed with the upgrade across my clusters. They all upgraded successfully so now my entire VCF Managed environment is at the proper build numbers for 4.2.0 BOM.