If you’re looking for a way to host website(s) and e-mail for yourself, friends, family, etc.. then you have many options. One way to do this is by using a shared hosting provider such as RackNerd. Yes, there are hundreds to choose from, this just happenst to be the one I had most recently used. Another, perhaps more interesting/fun way is to self-host!
Self-hosting can be a daunting idea, but there are plenty of resources available to help you get started. While some may imagine self-hosting as running hardware at home 24x7, that is not the only way. The cost of running a Virtual Private Server (VPS) has come down significanly over the last several years. To host several low-traffic domains, you can get by with a pretty low-end, inexpensive (Between $25-$40 USD per year) VPS. For this series, you should have a machine with the following bare minimum specs: 1 CPU, 1GB Mem, and 10GB of storage. This should be sufficient for learning and/or running a few small, low-traffic blogs with e-mail.
Part 1 of this series got the ball rolling by introducing you to what CyberPanel is and what you need to host it. In particular, I highlighted my VPS Provider RackNerd. Part 2 of the series focuses primarily on securing your VPS SSH server, updating the OS, and finally Installing CyberPanel. DO NOT SKIP the steps mentioned in this part of the series! You may be amazed at the number of brute force attacks on your SSH server! Part 3 and 4 will dive into the base configuration and setup & testing of your own free secure email server.
Here are the topics for this week’s article:
Part 2:
- Intro - Watch on YouTube
- SSH Access to VPS - Watch on YouTube
- Create a non-root user - Watch on YouTube
- Grant user sudo access - Watch on YouTube
- Add SSH Pub key for passwordless SSH access - Watch on YouTube
- Confirm SSH and sudo access of non-root user - Watch on YouTube
- Configure SSH Server to not permit root or password based logins - Watch on YouTube
- Confirm root cannot login - Watch on YouTube
- Update apt repo and upgrade packages on OS - Watch on YouTube
- Confirm “sed” is accessible as /usr/bin/sed - Watch on YouTube
- Install CyberPanel - Watch on YouTube
- Fail2Ban
- Reboot and Login to the CyberPanel UI - Watch on YouTube
- Video Walk-through
SSH Access to VPS
Many VPS providers will provide you with a Linux image that has SSH enabled on the default port of 22. Additionally, so that you can have full access, they allow root access with a password. Generally, they will have a randomly generated password for the root account. Here are some of my recommendations on first steps after getting a Linux based server setup:
- Create a non-root user with sudo access
- Add your public SSH key to the server to the new user
- Disable Password based SSH logins
- Disable root login
- ONLY allow your non-root user login access to SSH
- Change the SSH Server port
Get started by establishing an SSH session to your server.
1ssh root@server-ip-address
Create a non-root user
Creating a non-root user is pretty easy. On Ubuntu, we do it like this:
1adduser <username>
A home directory will be created: /home/username
Next, you’ll need to set a New password and retype it. You’ll then be prompted for some optional additional information:
- Full name
- Room number
- Work Phone
- Home Phone
- Other Feel free to leave each of those blank and simply hit enter.
Grant user sudo access
Once the user is setup, you should add the user to the sudo group using the following command:
1usermod -aG sudo <username>
Keep this current terminal window (or pane) open with root logged into your remote server. This will be your safety net, just in case you mess anything up. Since restarting the sshd service will make the changes take effect for NEW sessions, you could potentially lock yourself out if you do something wrong. So, you will do the remaining steps of configuration changes and verify connecting back to the server a few different times BEFORE you close this first SSH root session.
Now, open a NEW window (or pane) to continue on with the steps below…
Add SSH Pub key for passwordless SSH access
Here’s the easy way to copy your ssh public key to an SSH Server:
1# The following assumes your SSH keypair is the default name of id_rsa and id_rsa.pub
2# if you don't already have them, create a new keypair: ssh-keygen -t rsa -b 4096
3# it is not necessary to specify a password for your keypair - just remember:
4# you should never share/publish/show your id_rsa (private key) to anyone
5ssh-copy-id -i ~/.ssh/id_rsa.pub username@host-ip-address
After you issue that command, you’ll be prompted for your password, then the following happens:
- if $HOME/.ssh folder does not exist, it is created with chmod 700 (owner read/write/execute)
- if $HOME/.ssh/authorized_keys file does not exist, it is created with chmod 600 (owner read/write)
- the pub key is then appended to the $HOME/.ssh/authorized_keys file on the SSH server Once that is complete, you are not currently connected to the SSH server as your new user.
Confirm SSH and sudo access of non-root user
You may now attempt to SSH to the server (PubkeyAuthentication is generally enabled by default):
1ssh username@host-ip-address
If you followed all the steps correctly, your user should connect right up without any prompts.
You should also be able to issue commands that require root access as follows:
1sudo systemctl status sshd
You’ll be prompted for your password, then the command will complete as root!
The default timer on sudo is 5 minutes… So, after 5 minutes of inactivity, your authorization to sudo without re-entering the password expires. If you don’t like that, you have a couple options:
- Disable Password prompt for user
- Extend the timeout to something more reasonable like 30 minutes
The approach I offer in the following examples makes use of the /etc/sudoers.d folder. Any file(s) placed in that folder are processed by the sudoer config file. You may optionally just edit the /etc/sudoers file safely using the following command:
1sudo visudo
The visudo command will lock the sudoers file so that nobody else may edit it while you are working on it AND it will do a sanity check when you try to save it by parsing for errors.
Disable Password prompt for user
Add a new file to the /etc/sudoers.d folder as follows:
1# Replace "username" with the new user you have created:
2echo "$USER ALL=(ALL:ALL) NOPASSWD: ALL" | sudo tee /etc/sudoers.d/$USER
3# That command will output the contents of the /etc/sudoers.d/$USER file that was created
Once that is in place, any time you login in the future and wish to do sudo commands, you will no longer be prompted for your password.
Extend the sudo timeout to 30 minutes
1# Replace "username" with the new user you have created:
2echo "Defaults:$USER timestamp_timeout=30" | sudo tee /etc/sudoers.d/$USER
3# That command will output the contents of the /etc/sudoers.d/$USER file that was created
4# NOTE: Setting the timestamp_timeout to 0 will force password entry for EVERY use of sudo
Configure SSH Server to not permit root or password based logins
Now that you have confirmed you are able to login with a non root account and perform root commands, it is time to prevent root from logging in AND disable password based logins.
Edit the /etc/ssh/sshd_config file as follows. Find the following lines in the file and make sure they are not commented out and set the values exactly as shown here: (Note commented lines start with a #)
1PermitRootLogin no
2PubkeyAuthentication yes
3PasswordAuthentication no
Ok, that should do it for now…
Confirm root cannot login
Use ssh to try and connect to your server as root:
1ssh root@server-ip-or-fqdn
If you followed the configuration steps properly and restarted your ssh server, then you should get the following result:
1ssh: connect to host server-ip-or-fqdn port 22: Connection refused
Update apt repo and upgrade packages on OS
(approximately 5 minutes) It’s important to make sure that your operating system is up-to-date to help reduce the potential of bugs, vulnerabilities, etc… Since this article focuses on Ubuntu, the first thing we’ll do when we get connected to the VPS via SSH is run an update and upgrade:
Task time: Approximately 4 1/2 minutes
1sudo apt update && sudo apt upgrade -y
Next, cleanup any packages that are no longer required:
1sudo apt autoremove -y
Confirm “sed” is accessible as /usr/bin/sed
My first run-through of the installation, around 16 minutes in, I managed to catch many instances of /usr/local/lsws/lsphp72/bin/phpize: 1: /usr/bin/sed: not found and similar in the script output. When the installation completed, I issued the following command to see if sed was installed:
1which sed
That command only showed the following:
1/bin/sed
So, the sed command is installed and accessible via the PATH, but it’s not where the CyberPanel 2.1 Installation Script was calling it from. So in the following commands, we’ll make sure sed is installed AND accessible at the path the scripts appear to use. Additionally, we’ll make sure that curl is installed since it is used extensively by setup.
1sudo apt install -y sed curl
1sudo ln -s /bin/sed /usr/bin/sed
From what I can tell, the script will automatically run commands to remove potentially conflicting services such as postfix for example. Additionally, it will install and configure a firewall so no need to pre-configure any of these.
Install CyberPanel
(Approximately 18 minutes) There’s not a whole lot to the installation, you simply run the command:
1# if you are logged in as a regular use, change to root:
2sudo su -
3
4sh <(curl https://cyberpanel.net/install.sh || wget -O - https://cyberpanel.net/install.sh)
then, answer a few questions, wait about 17 minutes, and finally reboot.
If you’re following along on a single server/VM with no services running on other systems (DNS, mysql, etc…), then my video should be quite accurate until there are major changes to the installer and/or system requirements.
For full details and documentation, visit the CyberPanel doc.
You will see on my video walk through of this process that a clean Ubuntu 20.04 server at RackNerd doesn’t require much effort to get CyberPanel up and running successfully.
Fail2Ban
We’ll also install fail2ban as this will block IPs for 10 minutes that fail to login to your server 3 times. The fail2ban service is auto-started upon installation.
1sudo apt install -y fail2ban
Since CyberPanel installs and configures firewalld, let’s also make sure that fail2ban knows how to work with it:
1cat <<EOF | sudo tee /etc/fail2ban/jail.d/00-firewalld.conf
2[DEFAULT]
3banaction = firewallcmd-ipset
4EOF
For additional information on this faile2ban + firewalld config, see Fedora’s Wiki
Reboot and Login to the CyberPanel UI
Now that you’ve confirmed non-root access and have CyberPanel installation completed - and even added an extra bit of security, go ahead and reboot your server:
1sudo shutdown -r now
Give the server a couple minutes to boot, then attempt visit the admin prompts. https://your-server-ip:8090
You should be presented with the login screen:
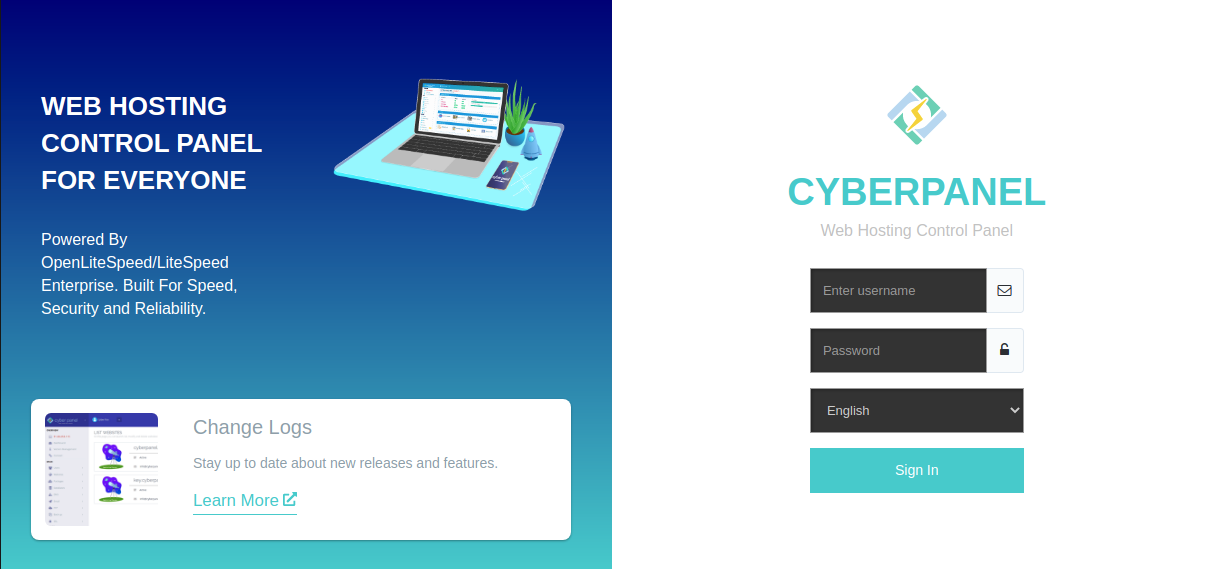
Enter admin as the username and retrieve the password you copied earlier from the summary page. Be sure to get the one for the login on port 8090!
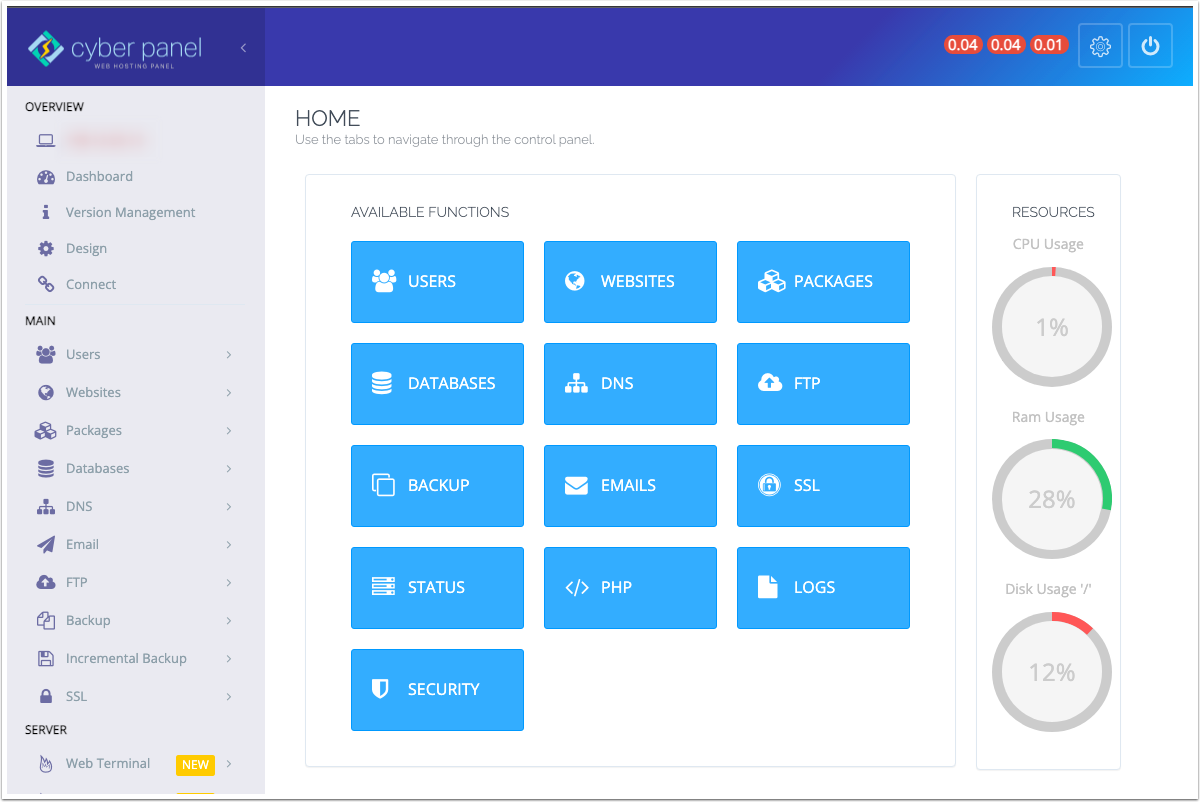
Once logged in, you’ll see the main CyberPanel Dashboard:
Video Walk-through
This wraps up todays article. Please do watch the YouTube Video. Please Like, Subscribe, and hit that bell icon for notifications of new videos. Any questions/comments should be posted to the YouTube video comments page. - thanks!

