We’ve reached the final part in my 4 part series on getting CyberPanel setup on a VPS with valid SSL and a secure email server!
In Part 1, we reinstalled the Operating System on our Virtual Private Server, had a brief overview of CyberPanel and its automated Lets Encrypt SSL renewal method, and discussed Glue Records with our Domain Registrar.
In Part 2, the focus was on allowing secure non-root access to the server, updating the Operating System, and installing CyberPanel.
Part 3 got some initial configuration tasks accomplished; including configuring and verifying DNS and securing & Verifying secure E-mail.
In this final part, we’ll be cleaning up access to the CyberPanel admin page and getting rid of the need to use port 8090. As a bonus, we’ll install a Dark Mode style for the UI and do a Wordpress installation. Below is a full list of tasks covered:
Part 4:
- Create a Website fpr CyberPanel Admin
- Confirm SSL enabled by Lets Encrypt
- Add SSL Cert to port 8090
- Remove the need to use port 8090
- Use CyberPanel firewall config to block port 7080
- CyberPanel Dark Mode
- Wordpress Install
- Re-try Joomla Install
- Video Walk-through
Create a Website fpr CyberPanel Admin
At this point, the CyberPanel page is simply working based on the IP Address and port 8090. Let’s create a website for it so that we may access the admin panel at a specific URL. For the purpose of this article, I will use “adminpanel.mylab.page”.

- Under Webistes, click Create Website
- For “Select Package”, just choose “Default”
- Set the Owner to “admin”
- Provide a valid e-mail account for the site
- Under Select PHP, specify any option - I went with PHP 8.0Failure to specify a PHP version will result in an error when clicking the Create Website button.
- For Additional Features, select SSL and open_basedir Protection
- Click Create Website
Confirm SSL enabled by Lets Encrypt
Try visiting the newly created site: adminpanel.yourdomain.lab
What doe you see?
Is your site serving a valid SSL Certificate?
While we’re looking at the certicicate, Here’s a great site to help evaluate your SSL Setup: SSLHopper
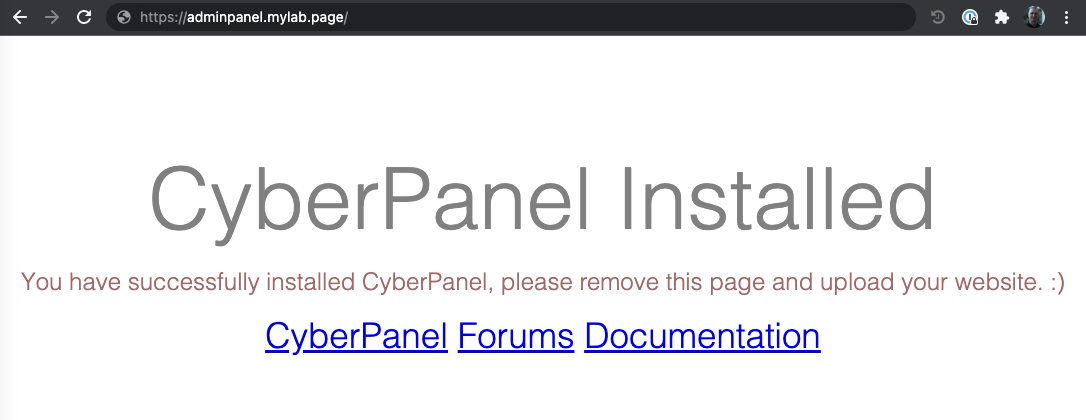
Okay, wait a minute, we’ve got a valid SSL ceritificate, but the page simply shows that CyberPanel is installed - aren’t we supposed to be making the CyberPanel UI more accessible?
Yes - we are, but it’s a multi-step process.
Try adding the admin port to your URL (ie: https://adminpanel.yourdomain.lab:8090).
What happens?

Why?
When we clicked the SSL feature, that simply enabled SSL on the default port 443 - NOT on the special port 8090 that is used for the CyberPanel services. Let’s take care of that now…
Add SSL Cert to port 8090
There is a special menu option to get an SSL certificate installed for port 8090. Only one “website” can have the SSL Certificate for port 8090 specified from what I’ve seen. This is likely due to the Certificate being installed for the hostname, as such, in order to add an SSL Certificate, do the following:

- On the left, click SSL, then select “Hostname SSL”
- In the Select Website dropdown, choose your adminpanel.yourdomain.lab
- Click Issue SSL
Give that a moment to complete, you should see the following message appear:

Okay, so if you re-visite https://adminpanel.yourdomain.lab:8090, you should now have a valid SSL Certificate working.
Yay! It’s working! but wait, I don’t like port 8090 - I’d prefer this to simply work without specifying the spacial port (IE: Use the default HTTPS port 443.) This can be a common requirement. For example, some employers block non-standard ports when connected to their environments. This security practice would prevent you from managing your site or checking webmail (yes, webmail is also on port 8090…), but most employers allow outbound access to port 443…
Remove the need to use port 8090
This appears to be a common enough request that there is a good write-up on it here: https://community.cyberpanel.net/t/how-to-remove-port-8090-from-cyberpanel/30648 . Please do visit that thread for the full details as I am not the author of this method. I will, however, include the two bits of code required for enabling this on OpenLiteSpeed powered CyberPanel since that is what my video shows.
- On your CyberPanel server (via SSH), add the following code block to this file: /usr/local/lsws/conf/httpd_config.conf
Remember to change the URL in the following code snippet to match YOUR chosen CyberPanel admin URL with YOUR domain. KEEP port 8090 in that snippet though!
1extprocessor cyberpanel {
2  type                    proxy
3  address                 https://adminpanel.yourdomain.lab:8090
4  maxConns                100
5  pcKeepAliveTimeout      60
6  initTimeout             60
7  retryTimeout            0
8  respBuffer              0
9}
- Add a RewriteRule to your website as follows:
- In your CyberPanel UI, go to Websites -> List Websites
- To the right of the panel with your adminpanel.yourdomain.lab, click Manage

Scroll down to Configurations and click on “Rewrite Rules”

When the textarea box appears below, enter the following code to enable the Rewrite Engine and setup the rule:
1RewriteEngine On
2RewriteCond %{HTTPS} !=on
3RewriteRule ^/?(.*) https://%{SERVER_NAME}/$1 [R,L]
4RewriteRule ^(.*)$ HTTP://cyberpanel/$1 [P]
That’s it! You should now be able to visit CyberPanel without specifying the port number!
Use CyberPanel firewall config to block port 7080
In the video, I step you through the process of using the CyberPanel firewall config to block port 8090 and 7080. Below are the commands you can run from your SSH session to block port 7080:
Cleanup firewall ports:
1# disable port 7080
2# - port was opened automatically during CyberPanel installation for OpenLightSpeed WebAdmin management UI
3
4sudo firewall-cmd --remove-rich-rule 'rule family="ipv6" port port="7080" protocol="tcp" accept' --permanent
5sudo firewall-cmd --remove-rich-rule 'rule family="ipv4" source address="0.0.0.0/0" port port="7080" protocol="tcp" accept' --permanent
6# Confirm firewall config is ok:
7sudo firewall-cmd --check-config
8# Now reload the firewall rules to activate changes:
9sudo firewall-cmd --reload
CyberPanel Dark Mode
Many people like to use a Dark Mode for their operating systems and apps. While CyberPanel does not have any built-in toggle to switch between light and dark mode, they do provide the ability to specify your own CSS to change the appearance of the user interface.
 To implement a Dark Mode:
- Click on “Design” in your CyberPanel UI
- Paste your CSS code into the “Custom CSS” text area
- Click Save Changes.
The appearance should change immediately.
The CyberPanel Darkside Theme I use in the video can be found here: DarkSide Theme by atualizado
For quick reference, here is the code posted there at the time of this article (Plus some of my own tweaks to improve it!):
 1body {
 2    font-size: 14px;
 3    color: #ccc;
 4    background: #333;
 5}
 6.bg-gradient-9 {
 7    background: #000;
 8    background: -moz-linear-gradient(-45deg, #000 0%, #333 30%);
 9    background: -webkit-linear-gradient(
10-45deg, #000 0%, #333 30%);
11    background: linear-gradient(
12-45deg, #000 0%, #333 30%);
13    filter: progid:DXImageTransform.Microsoft.gradient(startColorstr='#333', endColorstr='#000', GradientType=1);
14}
15#sidebar-menu {
16    background: #333;
17}
18#page-sidebar ul li.header {
19    color: #fff;
20    font-size: medium;
21}
22#page-sidebar ul li a .glyph-icon {
23    color: #fff;
24}
25#sidebar-menu > li > a {
26	color: #ccc;
27}
28.btn-primary {
29    background: #333;
30    border-color: #000;
31}
32.btn-primary:hover, .btn-primary:focus {
33    background: #202020;
34    border-color: #FFF;
35}
36.panel{
37	background-color: #222;
38	border-color: #666;
39}
40#page-content {
41    background: #222;
42}
43#page-title h2 {
44    font-size: 22px;
45    color: #fff;
46}
47.table {
48    background: #333;
49}
50.bootstrap-timepicker-widget table td input, .chosen-container-multi, .chosen-container-single .chosen-search input, .dataTables_length select, .form-control, .input, .ui-toolbar input, .ui-toolbar select, div.dataTables_filter input{
51	background: #333;
52    color: #ccc;
53    border: 1px solid #9b9b9b;
54    -webkit-box-shadow: inset 1px 1px 3px #222;
55    -moz-box-shadow: inset 1px 1px 3px #222;
56    box-shadow: inset 1px 1px 3px #222;
57}
58.bootstrap-timepicker-widget table td input:focus, .chosen-container-active, .chosen-container-multi.chosen-container-active, .form-control:focus, .input:focus, .selector.focus, .ui-toolbar input:focus, .ui-toolbar select:focus, div.dataTables_filter input:focus {
59    color: #fff;
60    border-color: #fff;
61}
62.current-pack{
63color: #FFF !important;
64}
65.control-label{
66color: #5f9ea0;
67}
68/*
69
70*/
71#loading {
72	height: 0%;
73	overflow: hidden;
74}
75/* Now fix other dark mode settings*/
76.c100 {
77	background-color: #404040;
78}
79.c100::after {
80	background-color: transparent;
81}
82.panel-body {
83  background-color: #202020;
84}
85.progressbar {
86  background-color: #101010;
87}
88.font-black {
89  color: #AAAAAA!important;
90  border-color: #AAAAAA!important;
91}
Here are a few other links to threads with alternative CSS designs in them:
Wordpress Install
- Click Websites -> List Websites
- For the site you wish to Install Wordpress, click the “Manage” link on the right
- Scroll to the bottom and click on Wordpress + LSCache
- Fill in the Install Wordpress Form as desired

- Click Install Now, wait for the “Successfully Installed” message
- Test the URL to your new wordpress page

Re-try Joomla Install
Unfortunately, as you will see in the video, Joomla does not appear to be a proper install with CyberPanel 2.1.

In fact, I also had tried the Mautic, Magento, and Prestashop but ran into similar issues - they simply didnt’ work!
Hopefully, in a future release those will either be fixed or simply removed. You can, of course, just install any of these (and many other) web applications manually using SCP, the CyberPanel FileManager, etc… In my previous years of running Joomla, PHPNuke, and many other types of systems, all were done via manual installations so that I would have full control and understanding of what was done on the server rather than relying on a control panel wizard to simply do it all for me. If you are a tinkerer, this works well - if you are a beginning hobbyist, it can be a bit overwhelming! In any case, good luck! There is always plenty to learn.
Video Walk-through
This wraps up today’s article. Please do watch the YouTube Video. Please Like, Subscribe, and hit that bell icon for notifications of new videos. Any questions/comments should be posted to the YouTube video comments page. - thanks!


